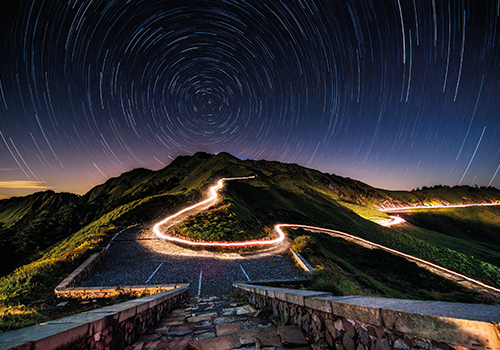
Sometimes the best photos are captured between dusk and dawn. Jac Kritzinger explains how to improve your night photography
Most people put away their cameras once the sun has set. Shooting at night poses some unique challenges, but it can also deliver eye-popping images with an otherworldly feel. So, pack a jacket, a flask of coffee and some patience, and try out these pointers for great nocturnal pics.
Long-exposure expertise
The key element in night photography is leaving the camera’s shutter open for an extended period. Select the manual or aperture-priority mode in order to leave the shutter open for up to 30 seconds; most models also offer a ‘bulb’ function that allows for unlimited exposure time. To ensure sharp images, a sturdy tripod is crucial. Once the camera is mounted, use a remote trigger cable (or self-timer) to open the shutter to avoid any camera shake. When using the bulb setting, a stopwatch is handy for timing exposures.
Avoid lenses with a focal length longer than 70 mm, as images often blur beyond this magnification regardless of camera stabilisation. Lastly, make sure that your camera’s battery is fully charged – long exposures can drain power very quickly.
Take your time
After sunset, dusk will give you a small window to work in before dark. Make use of this time to set up. A head torch can be helpful, keeping your hands free, but be sure you turn it off when you’re good to go; this avoids any unwanted light seeping into your photo.
One option is to start shooting while there’s still a dusky hue in the sky; this will often add much-needed colour and atmosphere to your shots. Try a range of exposures as the sky darkens until you are happy with the results.
Save the rush by presetting your camera, attaching the tripod plate and plugging in the remote cable before heading out. Sourcing your location during the day (even where to park) will go a long way towards ensuring a trouble-free shoot on the night. Get there early and relax – you may grab a sunset shot to boot!
Magic movement
Whether you’ve chosen a city vista or a striking rural landscape for your night shoot, be sure to incorporate movement. Combined with a long exposure, this will provide a dramatic blurring effect. Traffic transforms into bright neon lines, while moving water such as an ocean or river blends to a creamy haze.
When trying to capture starry skies, remember the Earth (and, in relation to it, the sky) is moving. One option is to use the shortest possible shutter speed by selecting a high ISO and a wide aperture, thereby minimising this movement and capturing the scene as the eye sees it. The other is to select a low ISO and a slow shutter speed to exaggerate it, creating abstract celestial lines (called ‘star trails’) in the sky. Be aware of the phase and location of the moon; as a dominant light source, it will dim the intensity of the starlight, but its movement can also create interesting impact.
Shed some light on it
Static objects such as buildings, rocks or trees can be illuminated to great effect at night by lighting them with a powerful torch or handheld hunting spotlight. Called ‘torching’ or ‘painting’, this involves covering your subject in broad, even strokes of torchlight while the shutter is open. Check your LCD after every long exposure until you get it right.
Use flash only when you want to freeze moving subjects such as animals or people. In this case, point an external flash in the desired direction during the exposure and fire it off manually at the decisive moment.
Try different angles, durations and power settings – these techniques can be tricky to master, but the effects are worth it. Also use ambient electrical light when shooting in cities at night
in order to add colour and energy to your shots. Street and window lights can be transformed into starry shapes by selecting a very small aperture such as f/16.
RAW power
Always make use of RAW format when shooting at night. As opposed to JPEGs, these files retain much more information, allowing you room to make substantial white-balance and exposure adjustments (both all-too-common issues with night photography) on your computer after the fact.
Photography Gallo/Gettyimages
(This article was first published in the autumn 2014 issue of AA traveller magazine)


